Wednesday, December 14, 2011

Using ReportViewer Control in ASP.NET MVC


Assembly References (From Visual studio2010 installation folder) :
Microsoft.ReportViewer.Common
Microsoft.ReportViewer.WebForms

Step 1 - Create a view called Report and bind it to strongly type ReportViewModel.


@model ReportViewModel
@{
ViewBag.Title = "Reports";
}

Reports: @Model.Title


Step 2 - Add a WebForm(ReportViewer.aspx) to your Web Project under a folder called Reports. It should have following html code in it.


<%@ Page Language="C#" AutoEventWireup="true" CodeBehind="ReportViewer.aspx.cs" Inherits="Sample.Web.Reports.ReportViewer" %>

<%@ Register assembly="Microsoft.ReportViewer.WebForms, Version=10.0.0.0, Culture=neutral, PublicKeyToken=b03f5f7f11d50a3a" namespace="Microsoft.Reporting.WebForms" tagprefix="rsweb" %>


Code behind

public partial class ReportViewer : System.Web.UI.Page
{
protected void Page_Load(object sender, EventArgs e)
{
string ReportName = Request.QueryString["Name"];
if (ReportName != null)
{
string ReportServerURL = Request.QueryString["ServerURL"];
if (ReportServerURL == null)
ReportServerURL = @"http://localhost/reportserver";

rptViewer.ShowParameterPrompts = true;
rptViewer.ProcessingMode = Microsoft.Reporting.WebForms.ProcessingMode.Remote;
rptViewer.ServerReport.ReportServerUrl = new Uri(ReportServerURL);
rptViewer.ServerReport.ReportPath = string.Format("/{0}", ReportName);
}
}
}

Reading .CSV file to DataSet in C#


Pre-Requisites (if you are using 64 bit CPU mode in IIS 7.0

Following code snippet is using Microsoft .Jet.OLEDB.4.0 to read the data from .CSV file. As 64 version of Microsoft.Jet.OLEDB.4.0 is not available, it will throw following exception while running on 64 bit CPU mode in IIS 7.0.


Microsoft .Jet.OLEDB.4.0 not registered on the Local Machine.

Fix – We have to run the Application Pool in "Enable 32 bit Application mode" in IIS7 manager using following steps

1. Right click on the Application Pool and select “Advanced Settings…” or select the same from the Actions pane after selecting the Application pool
2. Change the “Enable 32-bit Applications” to True (if you want the application pool to spawn in a 32-bit mode)
3. Click OK


public static DataSet ReadCSVFile(string directoryName, string filename)
{
string connString = string.Format("Provider=Microsoft.Jet.OLEDB.4.0;Data Source={0};Extended Properties=\"Text;HDR=Yes;FMT=Delimited;IMEX=1;\"", directoryName);
string cmdString = string.Format("SELECT * FROM [{0}]", filename);
DataSet dataSet = null;
using (OleDbDataAdapter dataAdapter = new OleDbDataAdapter(cmdString, connString))
{
dataSet = new DataSet();
dataAdapter.Fill(dataSet);
}

return dataSet;
}

Convert Dictionary object to System.Web.MVC.SelectListItem


Scenario - In ASP.NET MVC, you need Enumberable of SelectListItem object to bind to a DropDownList. But you have a dictionary object of Lookup values from DB. What is the best way to convert dictionary to Enumberable of SelectListItem.

Solution - Create an Extension method ToSelectListItems() which will convert the dictionary object to Enumberable of SelectListItem as follows:


public static IEnumerable ToSelectListItems(this IDictionary items, string selected = "1")
{
return items.Select(k =>
new SelectListItem
{
Selected = (k.Value == selected),
Text = k.Key,
Value = k.Value
});
}

Best way to change the ConnectionString dynamically in C#


Update the connection string dynamically.

using System.Data.SqlClient;
using System.Data.EntityClient;

public virtual string UpdateConnectionString(string database)
{
var _connectionString = "Data Source=.;Initial Catalog=SampleDB;Integrated Security=SSPI;MultipleActiveResultSets=True"
var sqlBuilder = new SqlConnectionStringBuilder(_connectionString);
sqlBuilder.InitialCatalog = database.ToString();
return sqlBuilder.ConnectionString;
}


Change Entity Framework ConnectionString dynamically

public virtual string UpdateEFConnectionString(string newConnectionString)
{
var csBuilder = new EntityConnectionStringBuilder();
csBuilder.ProviderConnectionString = newConnectionString;
return csBuilder.ConnectionString;
}

Best way to compare two objects in C#


Compare 2 instances of the class SubComponent


public class SubComponentSequenceComparer : IEqualityComparer
{
public bool Equals(SubComponent x, SubComponent y)
{
return x.Sequence == y.Sequence;
}

public int GetHashCode(SubComponent obj)
{
return obj.Sequence.GetHashCode();
}
}

Saturday, December 10, 2011

Deploy ASP.NET MVC Application on Azure


Step 1: Install Windows Azure Tools via WebPI. This will install any dependencies that are missing. Here is the link
http://www.microsoft.com/web/gallery/install.aspx?appid=WindowsAzureToolsVS2010


Step 2: Open Visual Studio2010 as an administrator and create an Azure Project.The Azure storage emulator requires administrator privileges.


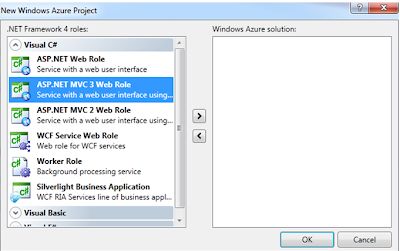
Step 3: In the next dialog, Add the MVC3 Web Role to the Azure Project.


Step 4: Choose Internet Application Project Template.

Web.Config Configuration for Azure Application - The detault providers (e.g. Membership, Roles, Profile) are configured as universal providers which work with SQL Azure.


Step 5: Create an Azure Hosted Service


In the create Azure Hosted Service, provide following information -


  • Choose a subscription : "Selected your already created subscription"
  • URL Prefix for your service : "My Service"
  • Region : "Choose your region"
  • Deployment Options : Do not deploy (at this point of time, our App is not ready for deploy)

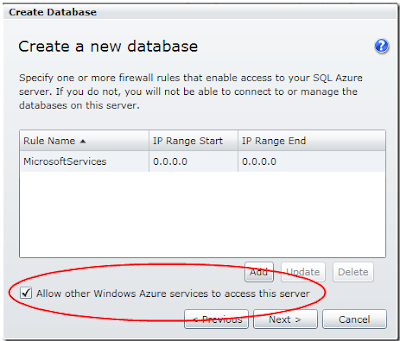
Step 6: Create a SQL Azure Database


View database properties


Step 7: Package the Application for Azure Deployment

  • Open the Web.config file and set the connection string appropriately and make two following changes:

    • Set the password for the database login which was configured previously.
    • Add “MultipleActiveResultSets=True” to the connection string. This setting is required by the Universal Providers used in the MVC 3 application.

  • Now we’re ready to package our application for Azure deployment.


  • The Azure service package and Cloud configuration files will be created and a Windows Explorer window will open up to the folder where the files have been created. Make a note of this directory location. We’ll need it later to find the package to deploy to Azure.

Step 8: Deploy the package on Azure


Happy Programming !

Monday, December 5, 2011

SQL Azure Reporting Services Advantages and Disadvantages


Advantages:

  • Highly available, the cloud services platform has built-in high availability and fault tolerance
  • Scalable, the cloud services platform automatically scales up and down
  • Secure, your reports and SQL Azure databases are on a safe place in the cloud
  • Cost effective, you don’t have to set up servers and you don’t have to invest in managing servers
  • Use the same tools you use today to develop your solutions. Just develop your reports in BIDS or Report Builder and deploy to Azure

Disadvantages are:

  • SQL Azure databases are the only supported data sources in the first version, more data sources are expected to come
  • No developer extensibility in the first version, so no custom data sources, assemblies, report items or authentication
  • No subscriptions or scheduled delivery
  • No Windows Authentication, only SQL Azure username/password is supported in the first version, similar to SQL Azure database. When SQL Azure database gets Windows Authentication, Azure Reporting will follow

What they added in CTP

  • The following new features are available in the new CTP:
  • Improved availability and performance statistics.
  • Ability to self-provision a SQL Azure Reporting server.
  • Windows Azure Management Portal updates to easily manage users and reports deployed to SQL Azure Reporting.
  • Availability of the service in all Microsoft Windows Azure datacenters around the world.
  • Official Microsoft support in this new CTP release.
  • Greater access for customers with no separate registration process required to use the new CTP.
  • developers can now author reports
  • Combined with the SQL Azure Data Sync (also in CTP release), SQL Azure Reporting enalbes new hybrid IT scenarios - for example, customers can schedule automatic synchronization of on-premises databases with SQL Azure, and then deploy cloud-based BI reports based on the synchronized cloud-based data sources.

Sunday, December 4, 2011

Amplify.Request

What is Amplify.Request ?


amplify.request is an abstraction layer that can be used for any kind of request for data. amplify.request sets out to separate the data retrieval and caching mechanisms from data requestors.

Demo Overview  Download

Requesting player list and player details using Amplify.Request.

.JS files


amplify.js
amplify.request.js
amplify.store.js


Amplify calls


HTML View


Amplify Demo


Players list:


Player Name:  


References :

http://amplifyjs.com/api/request/

Javascript Knockout

What is Javascript Knockout ?

Knockout is a JavaScript library that makes it easier to create rich, desktop-like user interfaces with JavaScript and HTML, using observers to make your UI automatically stay in sync with an underlying data model. It works particularly well with the MVVM (Model View View Model) pattern.

Demo Overview  Download

A simple scenario - Choose your indian cricket team for the upcoming Australia Serires.

Templating using JS Knockout


HTML View


Players Available :


Selected Players:


References:
http://knockoutjs.com/